How to Install a GFCI Outlet (And When You Need One)
You’re in your bathroom looking at an outlet with two buttons labeled “Test” and “Reset” between the plug slots. Or maybe you plugged something into an outdoor outlet and it immediately shut off. You hit the reset button and it worked again.
That’s a GFCI outlet doing its job. And if you don’t have them in the right places in your house, you’re missing a critical safety feature that could save your life.
GFCI outlets aren’t optional in certain locations – they’re required by electrical code. They prevent electrocution in areas where water and electricity might meet. And if you’re renovating a bathroom, kitchen, or outdoor space, understanding GFCIs isn’t just helpful – it’s essential.
Quick Answer
A GFCI (Ground Fault Circuit Interrupter) outlet detects dangerous electrical faults and shuts off power in milliseconds to prevent electrocution. Code requires GFCIs in bathrooms, kitchens (countertops), outdoors, garages, and unfinished basements – anywhere water might be present. Installing a GFCI outlet is similar to replacing a standard outlet but requires correctly connecting LINE and LOAD wires. Test GFCIs monthly using the test button to ensure they’re working properly.
⚠️ Affiliate Disclosure:
Some of the tools mentioned here include affiliate links. If you click and buy, we may earn a small commission, at no extra cost to you. We only recommend gear we’d actually use ourselves.
What Is a GFCI Outlet?
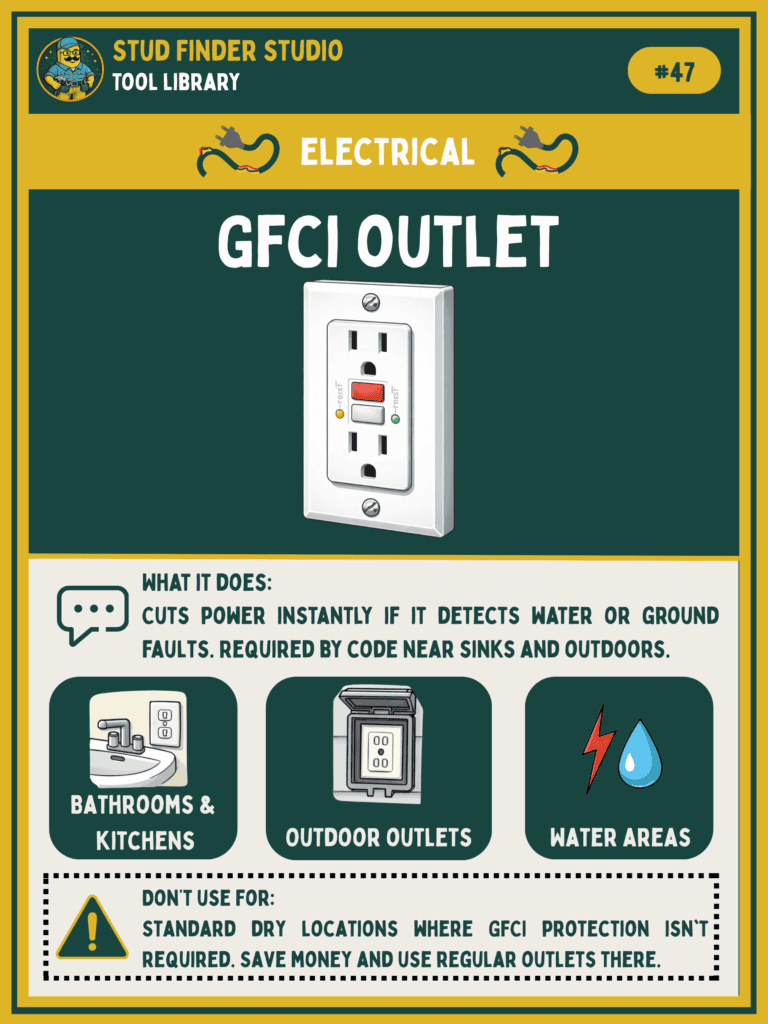
GFCI stands for Ground Fault Circuit Interrupter. It’s an outlet that monitors the flow of electricity and shuts off power the instant it detects a dangerous imbalance.
Here’s what that means in practice: electricity should flow from the hot wire through your device and back through the neutral wire in a balanced loop. If electricity starts flowing somewhere it shouldn’t – like through water or through you – the GFCI detects that imbalance and cuts power in about 1/40th of a second.
That’s fast enough to prevent electrocution.
How You Recognize a GFCI
GFCI outlets have two buttons between the plug slots – one labeled “Test” and one labeled “Reset.” Standard outlets don’t have these buttons. That’s the easiest way to identify them.
The test button trips the GFCI to simulate a ground fault. The reset button restores power after the GFCI has tripped. You should test your GFCIs monthly to make sure they’re working correctly.
GFCI vs Regular Outlet
A standard outlet delivers electricity with basic overcurrent protection from your circuit breaker. It stops power if there’s too much current flowing, but it doesn’t detect ground faults.
A GFCI outlet adds another layer of protection. It detects tiny imbalances in electrical current – as little as 4-6 milliamps – and shuts off power before that current can harm you. A standard circuit breaker won’t trip until current reaches 15-20 amps, which is far too much to prevent electrocution.
That’s why GFCIs are required in locations where water is present. Water conducts electricity, and if a live wire touches water while you’re touching that water, the GFCI is the only thing preventing serious injury or death.
Essential Tools: GFCI Outlet & Voltage Tester
Understanding these tools makes electrical work safer and more successful.
GFCI Outlet
What it is: Ground Fault Circuit Interrupter outlet with test/reset buttons that detects electrical imbalances
Where required: Bathrooms, kitchens (countertops), outdoors, garages, unfinished basements
How it works: Detects ground faults in 1/40th of a second and cuts power to prevent electrocution
Testing: Press test button monthly to ensure proper function
Cost: $8-15
Voltage Tester

What it is: Safety tool that detects live electrical current without direct contact
Why essential: Confirms power is off before working on electrical circuits
How to use: Hold near wires or outlets – tool lights up or beeps if voltage is present
Types: Non-contact voltage detector (easiest) or multimeter (more detailed)
Cost: $15-25
Want to learn more about essential electrical tools and home safety equipment? Check out our Tool Reference Library for detailed guides on tools every homeowner should know about.
Why GFCI Outlets Matter
Electrocution kills people every year. Many of these deaths happen in bathrooms, kitchens, and outdoor areas where water makes contact with faulty electrical equipment.
A GFCI prevents this by detecting ground faults before they become lethal. The moment electrical current starts flowing through an unintended path – whether that’s water, a person, or a damaged wire – the GFCI trips and stops the current.
The reaction time is critical. Brain damage from electrocution can occur in seconds. The GFCI reacts in milliseconds, cutting power before lasting damage occurs.
This isn’t theoretical. GFCIs have prevented thousands of electrocutions since they became standard in residential construction. Before GFCIs were required, electrocutions from household appliances were far more common. The introduction of GFCI protection dramatically reduced these fatalities.
That’s why electrical code now requires them in wet locations. It’s not a suggestion – it’s a safety mandate based on decades of data showing that GFCIs save lives.
Where Are GFCI Outlets Required?
Electrical code requirements vary slightly by location, but GFCIs are generally required in these areas:
Bathrooms
All outlets in bathrooms must be GFCI-protected. This includes outlets near sinks, in shower areas, and anywhere else in the bathroom. Water and electricity are a dangerous combination, and bathrooms have both in close proximity.
Hair dryers, electric razors, curling irons – all of these get used near water. A GFCI ensures that if any of these devices develop a fault while wet, power cuts off before you’re harmed.
Kitchens
All countertop outlets within six feet of a sink must be GFCI-protected. Kitchens have running water, wet hands, and plenty of electrical appliances. Dishwashers, garbage disposals, and other kitchen appliances also typically require GFCI protection.
Outlets for refrigerators and other appliances that aren’t near the sink don’t always need GFCI protection, but countertop outlets absolutely do.
Outdoors
Every outdoor outlet needs GFCI protection. Rain, sprinklers, dew, and ground moisture create constant exposure to water. Any outdoor outlet – whether it’s on your house exterior, in your yard, or on a shed – should be GFCI-protected.
Extension cords, power tools, holiday lights, and lawn equipment all plug into outdoor outlets. If any of these develop a fault in wet conditions, the GFCI prevents electrocution.
Garages and Unfinished Basements
Outlets in garages and unfinished basements generally need GFCI protection. These areas often have concrete floors that can be damp, and tools used in these spaces might be used outdoors or in wet conditions.
There are some exceptions for dedicated appliance circuits (like freezers), but general-use outlets in these areas should have GFCI protection.
Near Water Sources
Any outlet within six feet of a water source typically needs GFCI protection. This includes laundry rooms, utility sinks, wet bars, and pool areas.
If there’s a reasonable chance water and electricity might come into contact, code requires a GFCI.
How to Install a GFCI Outlet
Installing a GFCI outlet is similar to replacing a standard outlet, with one critical difference: you need to identify and correctly connect the LINE and LOAD wires.
Safety First: Turn Off Power
Before touching any wires, turn off the circuit breaker that controls the outlet. Don’t just turn off the switch – go to your breaker panel and flip the breaker off.
Test the outlet with a voltage tester to confirm power is off. Never work on live electrical circuits.
Tools and Materials You’ll Need
- GFCI outlet
- Flathead and Phillips screwdrivers
- Wire strippers (if wires need trimming)
- Voltage tester
- Electrical tape
GFCI outlets cost between $8-15 at most hardware stores. Major brands like Leviton and Eaton are reliable choices.
Remove the Old Outlet
Unscrew the outlet cover plate and set it aside. Remove the two screws holding the outlet to the electrical box. Carefully pull the outlet out of the box without touching any wires yet.
Look at how the wires are connected. Take a photo if it helps you remember the configuration.
Loosen the terminal screws and disconnect the wires from the old outlet.
Identify LINE and LOAD Wires
This is the critical step. GFCI outlets have two sets of terminals: LINE and LOAD.
LINE wires bring power into the GFCI from your breaker panel. These wires must connect to the LINE terminals on the GFCI.
LOAD wires carry power from the GFCI to other outlets downstream. These connect to the LOAD terminals. If you’re only replacing a single outlet and there are no other outlets downstream, you may not have LOAD wires at all.
If you’re unsure which wires are LINE and which are LOAD, here’s how to tell: Turn the breaker back on briefly and use a voltage tester to identify which wires have power. The wires with power are your LINE wires. Turn the breaker back off before proceeding.
Connect the GFCI
Strip about 1/2 inch of insulation from each wire if needed.
Connect the black (hot) LINE wire to the brass LINE terminal. Connect the white (neutral) LINE wire to the silver LINE terminal. Connect the green or bare ground wire to the green ground screw.
If you have LOAD wires, connect the black LOAD wire to the brass LOAD terminal and the white LOAD wire to the silver LOAD terminal.
Make sure all connections are tight. Loose connections cause arcing and fire hazards.
Test the GFCI Before Closing
Turn the breaker back on. Press the reset button on the GFCI if it’s not already in the reset position. The GFCI should now have power.
Press the test button. The GFCI should trip immediately and cut power. Press the reset button. Power should restore.
If the test button doesn’t trip the GFCI, something is wired incorrectly. Turn off the breaker and check your connections.
Once the GFCI tests correctly, carefully push it back into the electrical box, screw it in place, and install the cover plate.
How to Test a GFCI Outlet
You should test every GFCI outlet in your house monthly. This takes about 10 seconds per outlet.
Press the test button. The outlet should click and the reset button should pop out. If you have something plugged into the outlet, it will lose power.
Press the reset button. The outlet should click again and restore power.
If the test button doesn’t trip the GFCI, or if the reset button doesn’t restore power, the GFCI has failed and needs replacement.
I have three GFCIs in my house – one in the bathroom, one on the exterior, and one in the garage. I’ve tripped the exterior outlet before when using power tools. Hitting the reset button brought it right back. That’s exactly how GFCIs are supposed to work – they protect you by shutting off power when something’s wrong, and they reset easily once the problem is gone.
What If the GFCI Won’t Reset?
If you press reset and the button won’t stay in, there’s still a ground fault present somewhere on that circuit. Something is causing electricity to flow where it shouldn’t.
Unplug everything from that outlet and any outlets downstream. Try resetting again. If it resets, the problem is with one of the devices you unplugged. Plug devices back in one at a time to identify which one is causing the fault.
If the GFCI still won’t reset with nothing plugged in, the problem is in the wiring or in a downstream outlet. This requires troubleshooting the circuit or calling an electrician.
When to Call an Electrician
GFCI installation is straightforward if you’re replacing an existing outlet in a box that already has ground wires. But there are situations where calling a professional is the safer choice.
If your electrical box doesn’t have a ground wire (just black and white wires, no green or bare copper), you can still install a GFCI, but it must be labeled “No Equipment Ground.” An electrician can ensure this is done correctly.
If your house has aluminum wiring instead of copper, don’t attempt electrical work yourself. Aluminum wiring requires special connectors and techniques.
If you’re unsure about which wires are LINE and which are LOAD, or if the wiring in your box doesn’t match standard configurations, an electrician can sort it out safely.
And if you’re installing GFCIs as part of a larger electrical project or renovation, having a licensed electrician handle the work ensures everything meets code and passes inspection.
Final Thoughts From Stud Finder Studio
GFCI outlets exist for one reason: they save lives. The few extra dollars a GFCI costs compared to a standard outlet is nothing compared to the protection it provides.
If you have outlets in bathrooms, kitchens, or outdoor areas that aren’t GFCI-protected, upgrading them isn’t just a good idea – it’s required by code for good reason. Water and electricity don’t mix, and a GFCI is the safeguard that prevents tragedy when the two meet.
Testing your GFCIs monthly takes almost no time and ensures they’re ready to protect you when needed. It’s one of the simplest maintenance tasks in your house and one of the most important.
Whether you install them yourself or hire an electrician, making sure your home has GFCI protection in the right locations is a safety upgrade every house needs.
Related Articles You Might Find Helpful:
How to Unclog a Drain (The Method That Actually Works) – Practical home fixes
Where Is My Main Water Shutoff Valve? (And Why You Should Find It Today) – Another critical safety feature
How to Stop a Running Toilet (And Why It Happens) – Common home maintenance
How to Fix a Leaky Faucet (Simple DIY Repair Guide) – Plumbing repairs